How to a Screenshot in Laptop (Step by Step Guide)
Last updated on November 19th, 2024
Taking a screenshot on a Laptop is not different than taking screenshots on any computer, except that laptop keywords have a specific button that says Prt sc or Prt Scr for that specific purpose of taking screenshots and copying it to the clipboard.
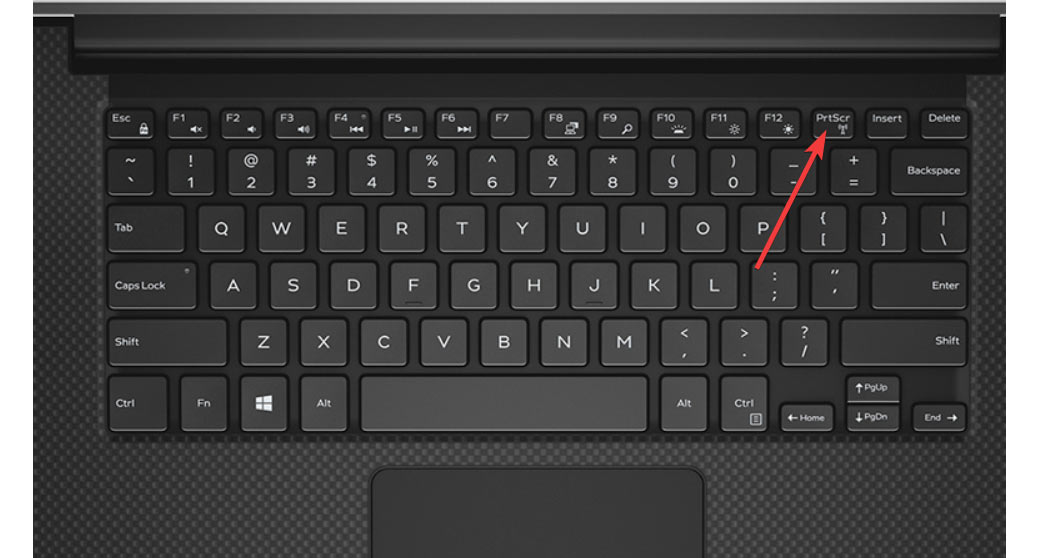
If you are on a Dell laptop, you can see a keyboard similar to the following image. Usually taking a screenshot on a laptop only requires you to press the Print Screen key, as shown below.
This key is usually displayed in a Dell computeras PrtScr, which can be found on top of the functions key bar. However, the exact placement may vary depending on the specific Dell laptop model. It’s important to note that the process of taking a screenshot does not directly involve the SSD (Solid State Drive) of the laptop. The SSD is primarily responsible for storing data and does not play a role in capturing screenshots.

Pro Tip: Did you know you can take a screenshot using PowerPoint? Check out our article How to Take a Screenshot in PowerPoint to learn more.
Step by Step – How to take a screenshot in a Laptop?
- Locate the Print Screen key on your laptop keyboard. For example, in a Dell XPS 15 computer, the Key is in the top bar next to the F12 button and at the left of the Insert key.
- Press the PrtScr key to take a screenshot of the visible area in the screen
- Go to a graphic program (e.g. Photoshop, Paint or even Microsoft PowerPoint) and press CTRL-V to paste the content of the clipboard.
By using this procedure, you can take awesome screenshots on your Dell laptop.
Alternatively, there are plenty of tools out there that can help you to take screenshots, be it on Dell or on any other computer model. If you are in PC (Windows 10 for example), one of our favorite tools to take screenshots is ShareX.
The process for taking a screenshot on a Dell laptop or desktop depends on your operating system. Here’s a simplified way to take a screenshot on a Dell computer.
For Windows, press “PrtScn” to copy your screen to the clipboard, or “Windows” + “PrtScn” to save the screenshot to your Pictures folder. For Ubuntu, press “PrtScn” to screenshot your screen and save it in the Pictures folder. For a specific window, press “Alt” + “PrtScn”. For a selected area, press “Shift” + “PrtScn”. The “PrtScn” key may vary as “Print Screen”, “PrtSc”, or “PrntScrn” on your keyboard.
