How to Resize an Image in PowerPoint Without Distortion
When designing a PowerPoint presentation, it’s common to insert images to enhance your message visually. However, resizing images without distorting them can be tricky. Distortion occurs when the aspect ratio of the image is not maintained, resulting in a stretched or squished appearance. This article will guide you through the steps to resize images in PowerPoint while preserving their original proportions and quality.

First step is to insert the image you want to show in the presentation slide. As soon as you insert the image, it will be placed in the slide, and if you have PowerPoint Designer activated, it will suggest possible enhancementes on the layout.
Understanding Aspect Ratio
The aspect ratio is the relationship between the width and height of an image. To avoid distortion, it’s crucial to maintain the original aspect ratio of the image when resizing.
If the aspect ratio is altered, the image may appear stretched or compressed, which can detract from the professionalism of your presentation.
How to Resize the Image in PowerPoint Using the Corners
After inserting the image, click on it to select it.
To resize the image without distortion, drag from the small corner handles (the small circles or squares located at the corners of the image in the PowerPoint slide).
Pro Tip: Hold down the Shift key while dragging a corner handle. This ensures that the aspect ratio is locked, keeping the image’s proportions intact.
Resize the Image in PowerPoint Using the Format Picture Pane
Another method to resize an image without distortion is through the “Format Picture” pane.
Right-click on the image and select “Format Picture”. In the Format Picture pane, click on the “Size & Properties” icon (it looks like a square with measurements).
Ensure the “Lock aspect ratio” checkbox is checked.
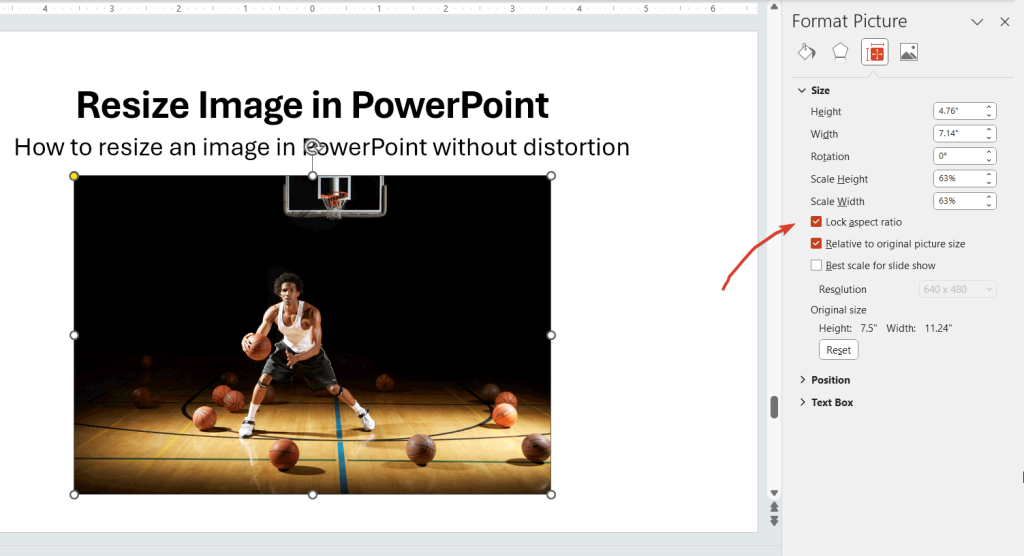
Enter the desired height or width in the respective fields. The other dimension will adjust automatically to maintain the aspect ratio.
Adjusting the Image for Specific Sizes in PowerPoint
If you need the image to fit specific dimensions (e.g., within a certain area of the slide), follow these steps:
First, determine the maximum height or width your image should occupy.
With the “Lock aspect ratio” option enabled, adjust one dimension (either width or height) to the desired size.
The other dimension will scale accordingly, ensuring the image fits within the specified area without distortion.
Cropping Instead of Resizing
Sometimes, resizing alone may not give you the result you want, especially if the image is still too large or small after resizing.
In such cases, consider cropping the image:
Select the image and click on the “Crop” tool in the “Picture Format” tab.
Drag the black cropping handles to remove unwanted parts of the image.
You can also crop to a specific shape if desired, while still maintaining the aspect ratio.
Resizing Multiple Images in PowerPoint
If you have multiple images on a slide and want them to be the same size without distortion, follow these steps:
Select all the images by holding down the Ctrl key and clicking on each image.

You can follow the same approach and select all the images to resize, then drag the corner of the image.
Right-click and choose “Size and Position.” In the “Size and Position” pane, make sure “Lock aspect ratio” is checked. Enter the desired size for one image, and all selected images will resize proportionally.
Extra Tips for High-Quality Images in Presentations
Always start with high-resolution images. Resizing low-quality images can result in pixelation or blurriness.
Avoid excessive resizing. It’s better to use images close to the desired size to minimize quality loss.
Conclusion
Resizing images in PowerPoint without distortion is essential for maintaining a professional and polished look in your presentations. By using the methods outlined in this article—resizing from the corners, locking the aspect ratio, and cropping when necessary—you can ensure that your images retain their original proportions and quality. Remember to use high-resolution images and avoid excessive resizing for the best results. Happy presenting!